Custom Commands
Visit the Custom Commands page on the dashboard and you will be presented with a list of your existing commands, or an empty list if you have none. You can click the + button to add a new command, or click on an existing command to edit it.
When setting up a new custom command, you can choose between one of two kinds of commands: text commands or script commands.
Text Commands
Section titled “Text Commands”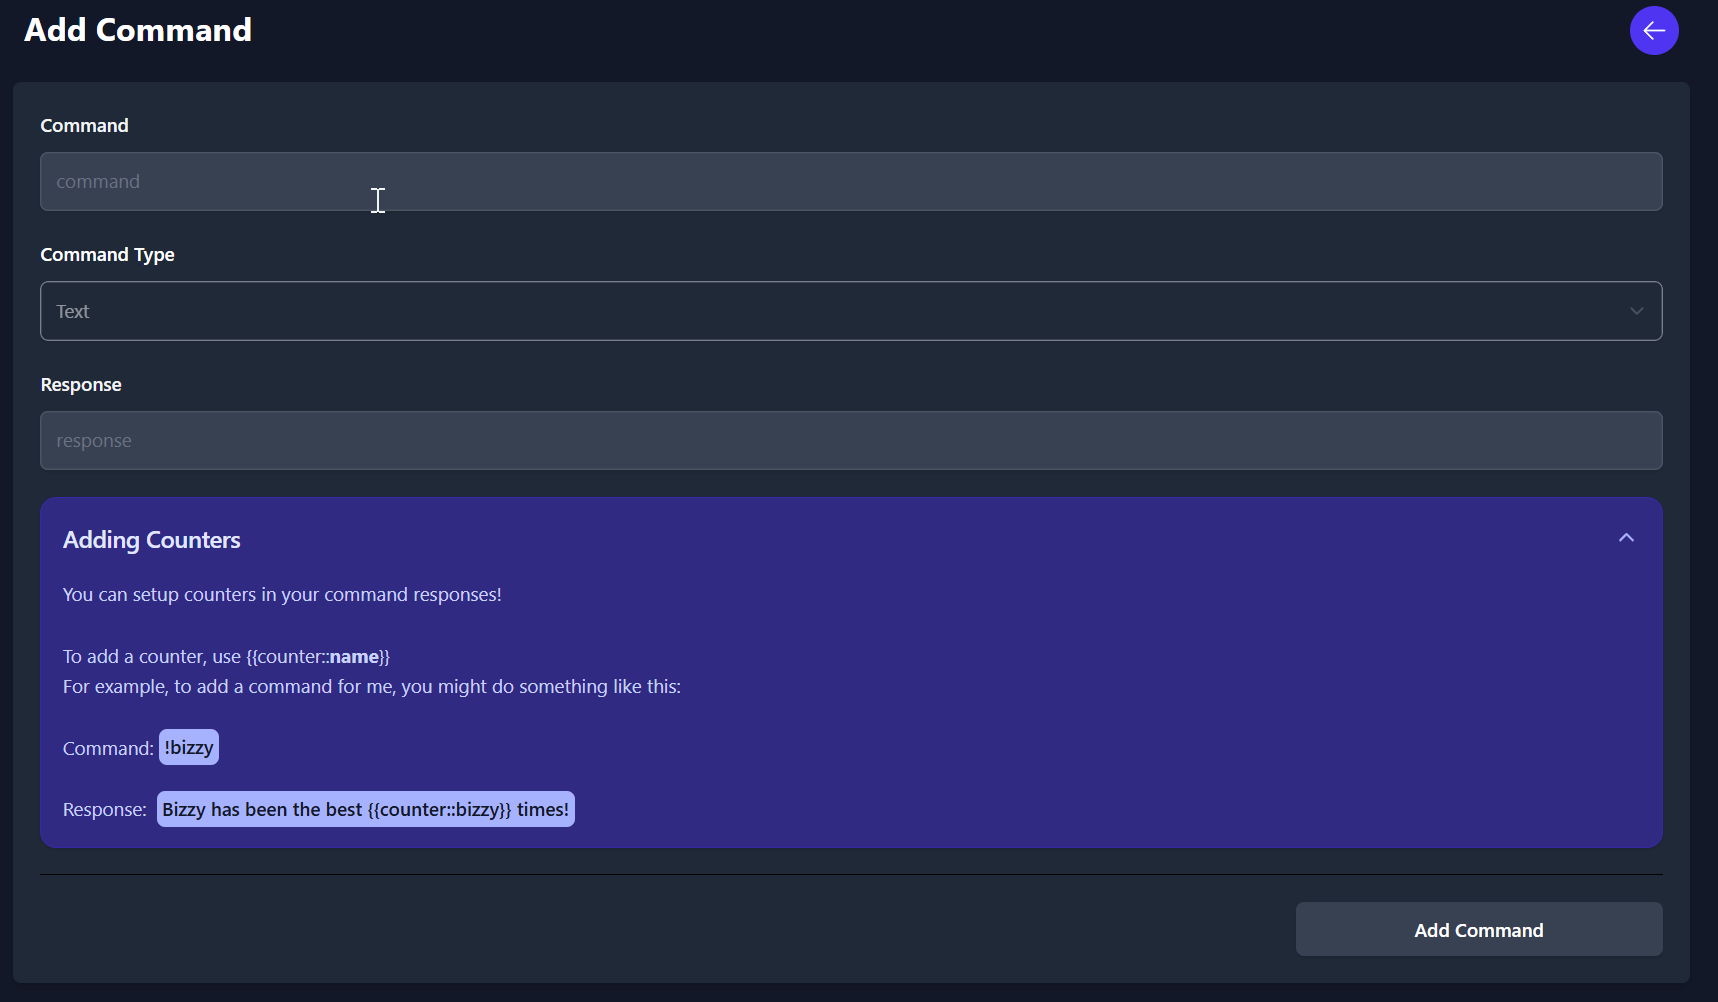
Text commands are fairly simple. Provide the command name (without the ! prefix, this will be added automatically).
Next, you choose the Text option and fill out the response you want the bot to return when you run the command. At this time, there is no support for embeds or attachments, just plain text. You can, however, create embeds with images using script commands (see below).
Ideally in the future I will add the option to paste the URL to an image to post, or allow uploading custom images to send.
The response field supports custom variables for counters, which are described in the Adding Counters dropdown.
Once you’ve filled out the options, add the command and try it out! If it doesn’t work, ensure the bot has permission to read and post in whichever channel you’re attempting to call the command in.
Manage text commands in Discord
Section titled “Manage text commands in Discord”Custom commands can be managed in Discord with a handful of Discord commands.
You can use the commands listed below to manage your custom commands.
All these commands require you to have the Discord Administrator permission in the server you are trying to use them in.
!addcmd
Section titled “!addcmd”Used to add a new custom command to your server.
This command takes 2 arguments. The first is the name of the Custom Command you wish to add. The second is the response text for the command.
Usage example:
!addcmd mycommand Hello, this command has been used {{counter::mycommand}} times!As you can see, the arguments mentioned in the Text Commands documentation can be used here.
!remcmd
Section titled “!remcmd”Used to remove a custom command from your server.
This command takes 1 argument. The name of the command you wish to remove.
Usage example:
!remcmd mycommandSimple!
!setcounter
Section titled “!setcounter”Used to set the value of a counter.
This command takes 2 arguments. The first is the name of the counter you wish to set. The second is the value you wish to set it to.
Usage example:
!setcounter mycommand 10Now if we use our command from earlier (!mycommand), it will increment by one and say:
Hello, this command has been used 11 times!!rscounter
Section titled “!rscounter”Used to reset a counter to 0.
This command takes 1 argument. The name of the counter you wish to reset.
Usage example:
!rscounter mycommandNow if we use our command from earlier (!mycommand), it will say:
Hello, this command has been used 1 times!Script Commands
Section titled “Script Commands”Script commands are more advanced. They allow you to write your own custom Javascript code which is executed in a sandbox with a handful of utility classes and variables passed in to help you.
The ctx object allows you to access the variables (such as the user who sent the message), and functions for replying with a message or a Discord embed.
When you switch the command type to script, the rest of the options will be replaced with a code editor where you can write your script.
Provided variables
Section titled “Provided variables”A few objects are provided to you with which you can perform some basic tasks and retrieve some information from the command usage.
The ctx object contains information about the command usage and allows responding to the command.
Here are the available properties:
ctx.sendReply(message)- Sends a reply to the original message that triggered the command. This can only be called once.ctx.sendEmbed(embed)- Sends a Discord embed as a reply to the original message that triggered the command. This can only be called once.ctx.getMessageAuthor()- Holds information about the user who used the command, and where it was used.
getMessageAuthor() returns an object containing the following properties:
username: string- Username of the user who triggered the commandping: string- @ ping for the user who triggered the commandavatarUrl: string- URL of the user’s avatardiscriminator: string- 4 number discriminator for the username (NOTE: Discord is phasing these out, most users no longer have one)displayName: string- Display name of the user who triggered the command in the current Discord server
As you can see, the ctx object allows you to send messages and embes and get information about the user who sent the command. You can see an example below on how to send embeds, I will document the embed types in a future update to these docs.
kvStore
Section titled “kvStore”The KVStore object allows you to store and retrieve data from the bot’s database. This can be used to store data between command usages.
It contains four methods:
kvStore.GetValue(key)
Section titled “kvStore.GetValue(key)”Returns the value stored in the database for the given key as a string.
kvStore.getIntValue(key)
Section titled “kvStore.getIntValue(key)”Returns the value stored in the database for the given key as an integer.
kvStore.SetValue(key, value)
Section titled “kvStore.SetValue(key, value)”Sets a string value within the database
kvStore.DeleteValue(key)
Section titled “kvStore.DeleteValue(key)”Deletes a value from the database.
kvStore.GetKeys()
Section titled “kvStore.GetKeys()”Returns an array of all keys stored in the database for the current guild.
Useful for keeping track of what keys you have stored (remembering you only get 100).
random
Section titled “random”The random object allows you to generate random numbers. Unfortunately, it is not possible to generate random numbers in Javascript without a seed, so the random object is seeded with the current time when the command is run. Using Javascript’s Math.random() function is not recommended as it will always return the same value.
Here are the available methods:
random.Next(min, max)
Section titled “random.Next(min, max)”Returns a random integer between min and max (inclusive).
random.NextDouble()
Section titled “random.NextDouble()”Returns a random double between 0 and 1 (inclusive).
Debug Logging
Section titled “Debug Logging”If you need to debug your script, you can use the console.log() and console.error() function to log messages. These are simple functions that on the backend side just take all string arguments provided and joins them with spaces.
When you go to edit the command, you will have a tab to see log messages for that command.
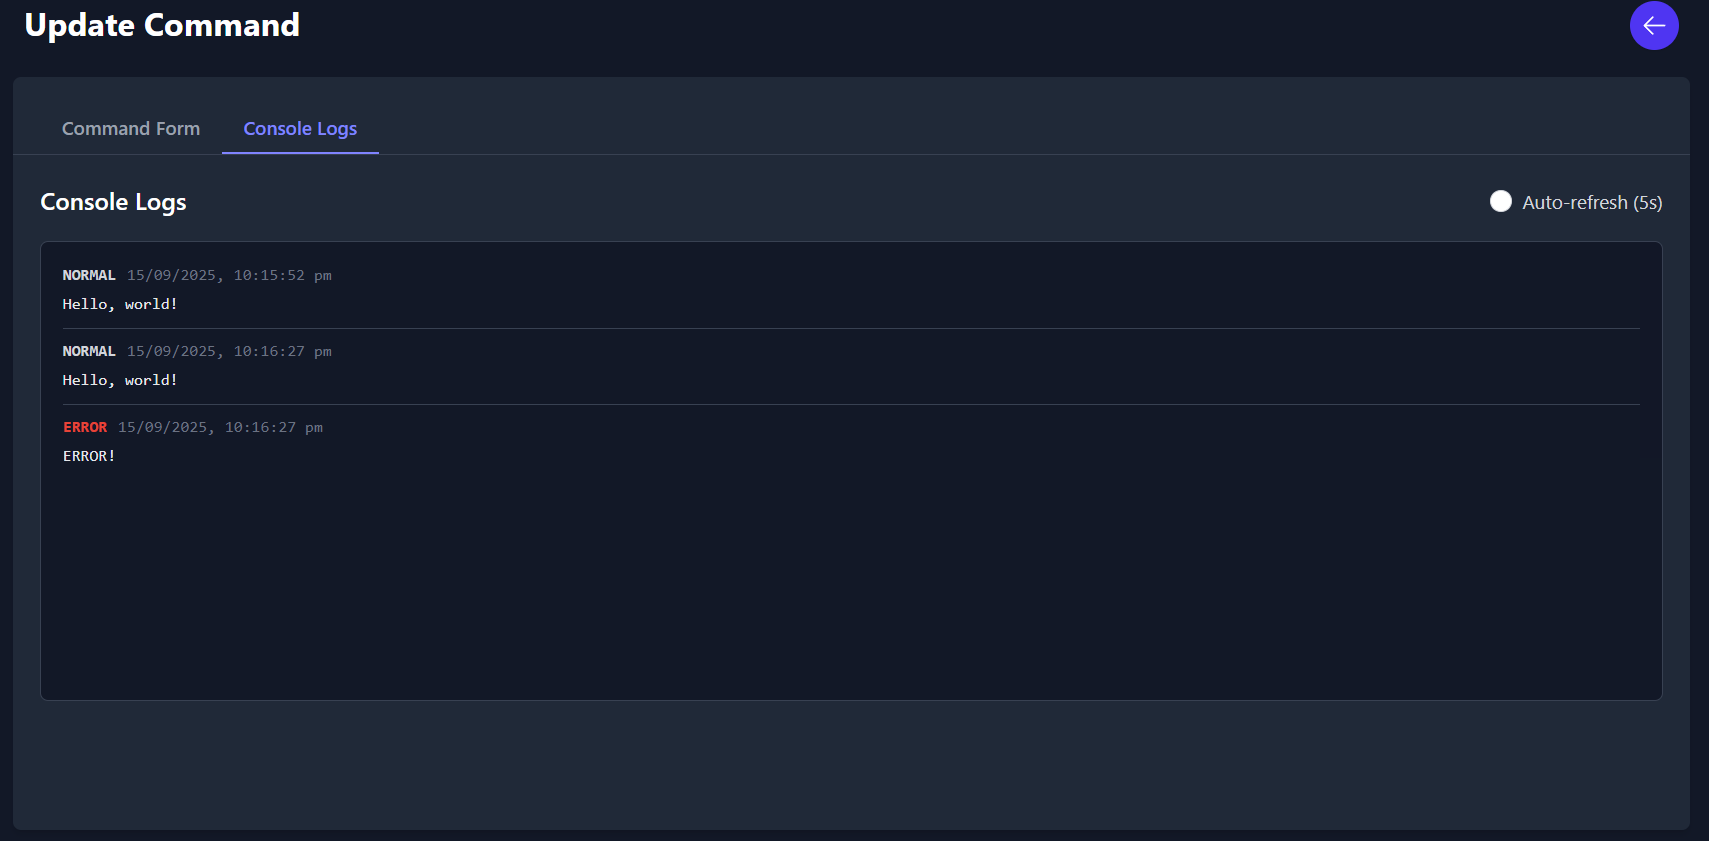 You can check the auto-refresh to have the logs update automatically, or you can manually refresh them by reloading the page (or enabling the option and waiting 5 seconds then disabling it).
Example Scripts
Section titled “Example Scripts”Here’s a few example scripts to get you started.
Simple response
Section titled “Simple response”This script will respond with a simple message when the command is used.
ctx.sendReply("Hello, world!");Counter
Section titled “Counter”Here is a custom script implementation of the counter argument from Text commands:
function getCounterValue(counterName) {    return kvStore.GetValue(counterName)}
function incrementCounter(counterName) {    let currentValue = parseInt(getCounterValue(counterName))
    if (isNaN(currentValue))        currentValue = 0
    currentValue++    kvStore.SetValue(counterName, currentValue.toString())
    return currentValue}
let counterName = "mycommand";ctx.sendReply(`Hello, my previous count was ${getCounterValue(counterName)}. My new count is ${incrementCounter(counterName)}`)
Random Number
Section titled “Random Number”This script will respond with a random number between 1 and 100.
ctx.sendReply(`Your random number is ${Math.floor(Math.random() * 100) + 1}`);Appreciate User1
Section titled “Appreciate User1”We’ve got someone in our Discord named User1, and we want to create a custom counter command for them that also implements random numbers to select from a list of responses.
const responses = [  "User1 has been the best {{times}} times!",  "User1 has been the coolest {{times}} times.",  "User1 has been the friendliest {{times}} times"]
function getCounterValue(counterName) {  return kvStore.GetIntValue(counterName)}function incrementCounter(counterName) {    let sval = getCounterValue(counterName)    let currentValue = parseInt(sval)
    if (isNaN(currentValue))        currentValue = 0
    currentValue++    kvStore.SetValue(counterName, `${currentValue}`)
    return currentValue}
let resp = responses[random.Next(0, responses.length)]
resp = resp.replace('{{times}}', incrementCounter('user1Counter'))ctx.sendReply(resp)
Sending embeds
Section titled “Sending embeds”This below example shows you how to send a Discord embed using the ctx.sendEmbed() function.
the embed.Message field sets the content for the message itself, and sits above the embed. This can be removed if you just want the embed.
const embed = new ScriptDiscordEmbed();
embed.message = "Message Content";embed.title = "Embed Title";embed.description = "This embed was sent with BizzTheMemeBot using a custom script command";embed.color = 0x5865F2;
const author = new ScriptDiscordEmbedAuthor();author.name = "BizzyColah";author.url = "https://bizzy.live";embed.author = author;
const footer = new ScriptDiscordEmbedFooter();footer.text = "Footer text";embed.footer = footer;
const csFieldList = new EmbedFieldList();
const field1 = new ScriptDiscordEmbedField();field1.name = "Field 1 Title";field1.value = "Value for field 1";field1.inline = true;
const field2 = new ScriptDiscordEmbedField();field2.name = "Field 2 Title";field2.value = "Value for field 2";field2.inline = true;
csFieldList.Add(field1);csFieldList.Add(field2);
embed.fields = csFieldList;
ctx.sendEmbed(embed);